*** EEPE Spalsh replacer requires a clean 2bit (two colour only) image file. ***
*** Bmp file MUST be saved as 2bit (just bw, saving as a 256 colour or 24bit bmp will result in pixels all over your image, as seen below -scroll down, you'll see-)***
You can scroll down to : USING EEPE Splash editor... if you jsut want to know how to use the editor
The follow 9 steps are how to ceate a 2bit image suitable to load into EEPE Splash replacement utility.
(My personal favorite to edit images quickly is Jasc Paintshop Pro, it loads fast and easy to use)
Steps...
1) Load your paint program (preferably one that can handle layers)
2) Create a blank canvas, I like working larger , then scaling the down the image to achieve the end result.
o 403 x 208 is the resolution I used to create these splash screens.
o white background
o 24bit
3) Load , create elements you wish to use , ensure that you convert them to bw images (silhouettes, no colour)

4) Place the elements you want to use, images, text in layers on the canvas you created.
5) Once you have create something you are happy with, merge the layers
6) Reduce the colour palette from 16mill(24 bit) to 2 colour (2bit)
- Play around with error diffusion and other settings (if you have them) when you reduce colours, each programme has different methods, and you need to find ones that work for you.
- this is the max number of colours that er9x can use for a splash screen
- this also gives you a realistic representation of how your final splash screen will look
7) Scale your splash screen down to 128x64
- you will undoubtedly notice your marvelous creation has taken a huge turn from wonderful , to something less than perfect.

8) Edit your scaled down image to fix any rogue pixels, clean up imperfections and you can add the `Pilot`at this stage, or other text.

9) Save your final splash screen as a bmp file. It handles 2 bit images. saving as a jpeg file will increase the bit depth and possibly add artifacting to the edges if you use a compressed setting. (and the eepe image reader will not read jpeg files... this is a good thing!)
eepe splash editor will support the following : bmp , png and a few others.
USING EEPE Splash editor...
Once you've saved your 2bit graphic,
Start eepe, on the top menu, there will be a new icon, on the right top that will open up a replace splash dialog.


You now can look at the splash of you hex file (load from hex) or load a graphic (Load Image) to replace the splash screen in the hex file.
Load from image is straight forward, you can navigate to whatever directory your images are in. The spalsh utility will only list files that are compatible. Select one, and you'll see it in the window
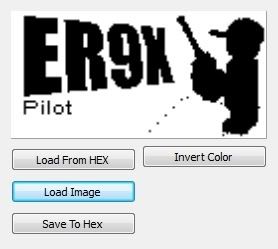
(This image has dots on it, this was a bitmap that was NOT a 2bit image. It was jpg saved as bmp then loaded)
Just make sure the graphics you load are 2bit, amy more than that you will get random pixels on the loaded image.

(This image was saved properly, as a 2bit bmp file)
Once you've loaded the image you want, it's time to write it to the Hex file you wish to have the new splash screen.
Click 'save to hex', a dialog opens, and you now select the Hex file that gets the new splash.
That's it, now you can burn the new hex file to your Radio, your friends Radio, or any modified compatible tx in your reach.