Page 7 of 9
Re: Custom Spray
Posted: Sun Mar 10, 2013 7:13 pm
by tilmanb
White primer. Bloody thing needs to dry 24h

Re: Custom Spray
Posted: Sun Mar 10, 2013 10:53 pm
by Scott Page
tilmanb wrote:White primer. Bloody thing needs to dry 24h
Much better than rushing things and getting orange peel finish. Don't ask me how I know.

Re: Custom Spray
Posted: Mon Mar 11, 2013 2:39 am
by JustinTime
Jim, I think that you'll find that there is always one color that will disperse the other colors. I had the same thing yet in the finish product they all come out OK. I wanted the white to be dominant and it is, on the left transmitter on page 6. After hearing from you about the rush of water into the transmitter I did mine very slowly and I moved a lot left to right (or vise versa) and I got the pronounced swirl. I mixed my paint too much and as a result the 'lines' are thin. I would not mix as much as I did next time.
I had put a note in the wiki to leave the protective film on the decals and screen cover. I did it to the decals on the back cover and it worked great. After the painting the film comes off easy and the decal is pristine.
BTW, the spray into a cup method is also cheaper than the Testor paint.
Bonus!!! LOL Also, you are lucky to find the plasti dip for $15 shipped. The lowest I found now is $22 shipped.
Re: Custom Spray
Posted: Tue Mar 12, 2013 12:06 am
by tilmanb
Bronze metallic. I agree, it's a bloody weird colour.
But the idea is that this is just the undercoat for the carbon effect hydro transfer film which has transparent bits.
I was hoping for more gold than brown, but one thing is sure, it will be individualistic and better than black.

Re: Custom Spray
Posted: Tue Mar 12, 2013 12:25 am
by Daryoon
Didn't I read that you're suppose to spray over primer after a short amount of time? I used to think that I needed to let primer dry and cure like paint. But the opposite it true? Read the direction on the can.
Nice work everyone. Keep sharing those photos.
Re: Custom Spray
Posted: Tue Mar 12, 2013 5:43 am
by JustinTime
Just looked up 'water transfer printing'. All I can say is 'wow'. That stuff in not cheap. I think I'll stick with the dip method I used for my transmitter.
Three cans of paint will last for more transmitters than I can shake a stick at and cost about $12!
Re: Custom Spray
Posted: Tue Mar 12, 2013 12:15 pm
by formontoya
Daryoon wrote:Didn't I read that you're suppose to spray over primer after a short amount of time? I used to think that I needed to let primer dry and cure like paint. But the opposite it true? Read the direction on the can.
Nice work everyone. Keep sharing those photos.
As with most paint one either applies mutiple coats roughly 15-20 minutes apart or wait several hours between, preferably 24. And I only do 3-4 coats max "back-to-back" (could be 2 coats of primer and 2 coats of color). The reason is for "out gassing" or the fumes. If the paint is fresh then the gasses pass through the layers, if one has layers that are painted sporadically apart then the gasses might not pass as readily and will cause blemishes to appear in the paint.
When I painted mine I did 2 thin coats of primer and actually waited until the next weekend to lay the base coat, 2 thin coats of red and another weekend before I dipped...overkill as a day between would have done it, but time constraints dictated how long it took and it looks nice.
On water transfer...looks similar to the swirl process without the headache of laying the paint oneself. I did not look hard enough to see what the prices are, but what did it run for the pattern you're using?
Re: Custom Spray
Posted: Tue Mar 12, 2013 12:33 pm
by tilmanb
I just went for a boring carbon lozenge effect pattern. Mainly because that was the cheapest. If you look around on ebay you can find great deals. (Don't forget the activator) I paid I think roughly 30GBP for my stuff.
There are basically two types of patterns.
Fully covering colour patterns where you would ideally never see any of the base coat. (They do usually tell you which base coat you should underlay for best colour effect)
Or transparent patterns where the base coat will either fully or semi transparent shine through the pattern. Like for example black tiger stripes on any colour you like.
My pattern has fully and semi transparent and fully black lozenges.
Finish with clear coat.
I am slightly concerned about the deep patterns in the case. I hope it will enter in the depressions around the trim sticks. Will see. I hope to do it today...
Re: Custom Spray
Posted: Tue Mar 12, 2013 11:00 pm
by tilmanb
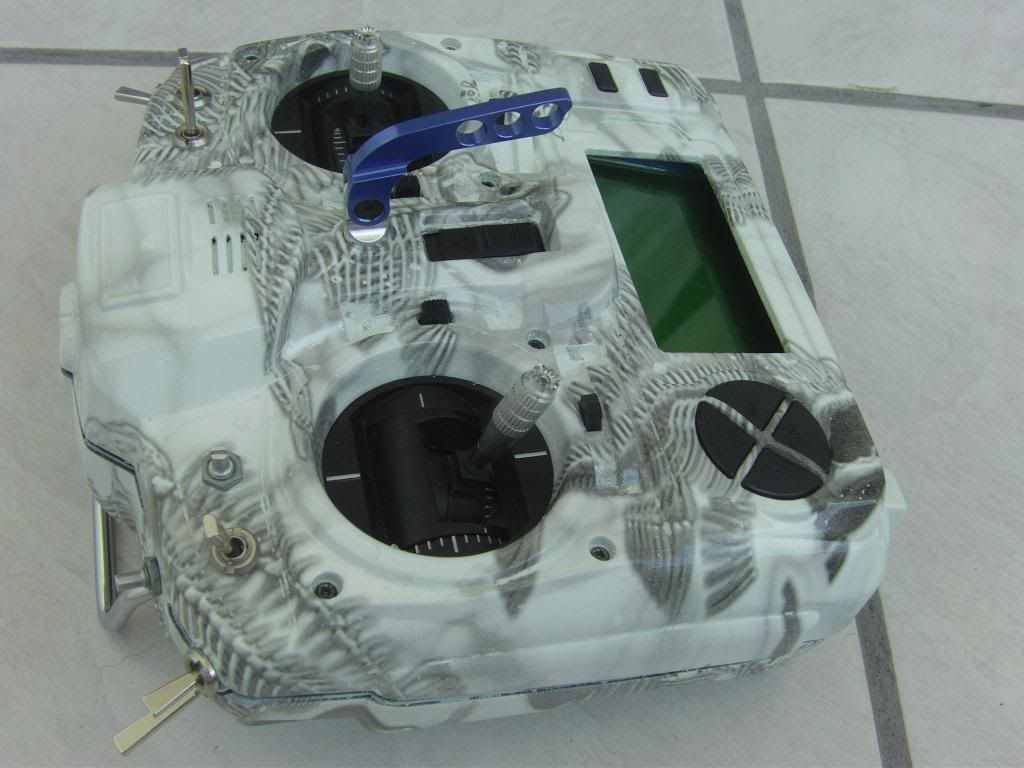
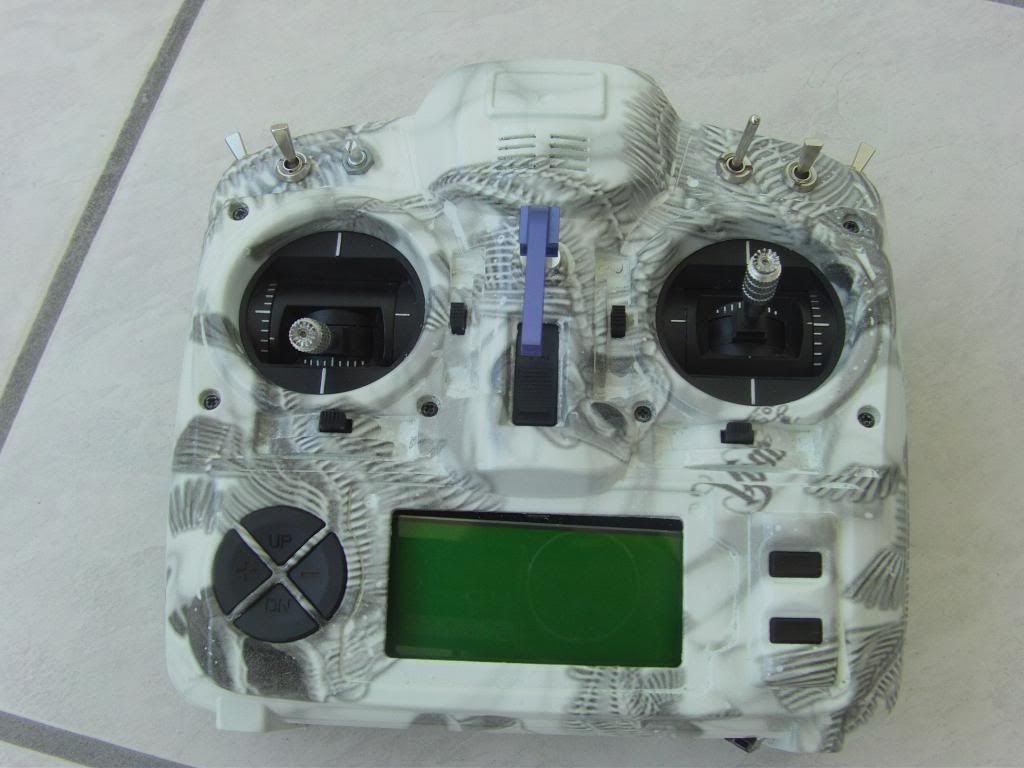
OMG OMG OMG, I made a huge fuax pas. I can't believe my sloppiness.
The dipping went quite ok, the result is very un-uniform but I will leave it like that. It's not perfect but it works.
(It looks less dark in nature unfortunately)
When I went to get the clear coat I picked up the can and realized what I just picked up was the can of hydrofilm activator.
I had actually used clear coat to activate the film. The crazy thing is, it worked pretty much perfect. But it probably explains the scum that collected on the water surface and the slightly greasy appearance of the coated surface.
I have to say I'm even more impressed with the result now. I could not believe that had worked.

I would not advocate it, but it seems you can save a buck and use clearcoat.
It is definitely worth practicing a bit more.
Re: Custom Spray
Posted: Tue Mar 12, 2013 11:02 pm
by tilmanb
PS: If anyone in south England would like to pick up the remaining film (ca. 2m left) and a full bottle of activator, please let me know.
Re: Custom Spray
Posted: Wed Mar 13, 2013 12:52 am
by JustinTime
Good looking, tilmanb. For a faux pas it looks perfect to me.
And I know it was meant to be lighter on the left side. I know it was not a mistake. It's artistic, right?

Re: Custom Spray
Posted: Wed Mar 13, 2013 2:52 am
by formontoya
Bad thing about a "one shot" pattern is that one can not really practice to uncover issues that might crop up. However, I agree, any "mistakes" make the end product even more "yours". Something one does with their own hands and that's cool.
I like the pattern myself and think it turned out pretty good for a first timer...
On top of that you're the first to do it, the "pioneer"...+1 there!
Re: Custom Spray
Posted: Wed Mar 13, 2013 4:43 am
by Rob Thomson
Looks good.
Will hopefully get to see it next week in the flesh!
Sent from my Nexus 7 using Tapatalk 2
Re: Custom Spray
Posted: Wed Mar 13, 2013 10:05 am
by tilmanb
JustinTime wrote:And I know it was meant to be lighter on the left side. I know it was not a mistake. It's artistic, right?
Re: Custom Spray
Posted: Wed Mar 13, 2013 10:25 am
by tilmanb
Rob Thomson wrote:
Will hopefully get to see it next week in the flesh!
Can't wait to show it off.
Things are coming together fast. The radio is still in bits and un-modded but I have all the parts for a quick and dirty hack. Probably first without the voice mod, even though I expect the board any day in my mailbox.
The Phoenix needs a wire harness and the Hawk a paint job. But They will fly without.
Re: Custom Spray
Posted: Wed Mar 13, 2013 5:13 pm
by Rob Thomson
Lol... you can always fly my wildthing if you come unstuck!
Re: Custom Spray
Posted: Fri Mar 15, 2013 7:16 pm
by Scott Page
Wow, the paint by tilmanb is just incredible. It's hard to believe how far this practice has come (good or bad depending on point of view) since Rob originally (I think) painted one half of one yellow.
I have been working with the laser cutting LCD covers and the printable vinyl and I finally have products that I'm happy with. Once I figured out I needed to print a mirror image on clear and then back sprayed that with white (for the white lettering) things went much better. Not perfect, but I'm happy. I'd originally tried covering the existing screen and was really not liking that very much.
Re: Custom Spray
Posted: Fri Mar 15, 2013 8:29 pm
by Rob Thomson
You should make and sell them?
Sent from my GT-I9300 using Tapatalk 2
Re: Custom Spray
Posted: Sat Mar 16, 2013 12:22 am
by tilmanb
Ack, they look great. I would buy one.
Thanks for the praise. It looks really bling.
I added to much clear coat, it looks like a candy bar.
And the coating is quite fragile. I banged up the edges already. I think it needs a few days to become hard. It's really a learning curve.
I'm still envious of your swirls.

Re: Custom Spray
Posted: Sat Mar 16, 2013 3:54 pm
by Scott Page
Clear coat takes weeks to completely cure. Be careful with it in the sun in the meantime - as some clear coats are UV sensitive until completely cured and will turn smokey.
Re: Custom Spray
Posted: Sat Mar 16, 2013 6:26 pm
by Flaps 30
Hmm... If you let nature take its course. Then I reckon the paint and clear coat would be cured in say three months or so.
You could try to bake it in an oven on a very low heat, or find some friendly body restorers who have a paint drying booth that you could make use of.
I did try a test spray of some paint that was supposed to eat into the surface of the plastic. Sadly it wasn't effective.. Probably the plastic is the wrong type for it. --->
http://en.wikipedia.org/wiki/Vinyl_dye
Re: Custom Spray
Posted: Sun Mar 17, 2013 2:56 am
by Scott Page
I now use a small convection oven @ 150 degrees for everything I spray that will fit in it. It helps tremendously.
Re: Custom Spray
Posted: Tue Mar 19, 2013 3:49 pm
by formontoya
Great job on the labels Scott...and yes, you should sell them. When I did mine I had to buy a 3 run set so I had 2 left over. After the Tx hit the field the other 2 were gone...1 sold and 1 is going to a buddy's TX that got me in the air. I like how you've changed the color to suite the TX colors...looks sharp.
Re: Custom Spray
Posted: Tue Mar 19, 2013 4:05 pm
by formontoya
Scott, on a side...where did you find what looks like a purple backlight?
Re: Custom Spray
Posted: Fri Mar 22, 2013 5:12 am
by Scott Page
formontoya wrote:Scott, on a side...where did you find what looks like a purple backlight?
Colored gel filter -- could do the same with any colored transparent material from the craft store.
Re: Custom Spray
Posted: Fri Mar 22, 2013 5:16 am
by Scott Page
formontoya wrote:Great job on the labels Scott...and yes, you should sell them. When I did mine I had to buy a 3 run set so I had 2 left over. After the Tx hit the field the other 2 were gone...1 sold and 1 is going to a buddy's TX that got me in the air. I like how you've changed the color to suite the TX colors...looks sharp.
I learned a long time ago to never sell anything in a hobby or the hobby is ruined
for me. I give stuff away all the time. I don't even barter -- just hate the process of evaluating the "worth" of something. I'll stomp the c**p out of an airplane and put it in the trash before I'll sell it at a swap meet -- or I'll give it away straight up.
Re: Custom Spray
Posted: Fri Mar 22, 2013 9:00 am
by jhsa
Yeah, I know what your're talking about..
In my old club some years ago, we had two guys that had a business with hobby stuff. There were always arguments and there was always a bad atmosphere.. That was one of the reasons I left the club and the hobby..
João
Re: Custom Spray
Posted: Sun Mar 24, 2013 3:43 am
by Scott Page
I hope to be able to get an extra Taranis case -- so I can spray and customize it without having the tx offline. I work very slowly when painting.
Re: Custom Spray
Posted: Tue Mar 26, 2013 11:27 pm
by nsf
nsf wrote:
Had to open the radio to do a full erase (see
here). Since it's open, I think I'm going to take some pictures of the inside. I had some problems with the navigation buttons because I wanted to reverse the + and -, as suggested
here by erazz. On the assembling I kept having problems with the up button, always getting stuck. My solution was cutting off all the buttons of the plastic frame, apply a dab of glue and place them directly on the switches in the board.
I was a little sceptical about this, but it surprised me. Pushing the buttons feels completly different now comparing to the stock 9x I have. They are more smooth and responsive and less noisy.
It's been a while but here it is.
Going to do the same thing to the other 9x.

Re: Custom Spray
Posted: Mon Apr 22, 2013 3:51 am
by BENJAS